Anywhere in England, Anywhere in Northern Ireland, Anywhere in Scotland, Anywhere in Wales, Bedfordshire, Berkshire, Bristol, Buckinghamshire, Cambridgeshire, Cheshire, Cornwall, County Durham, Cumbria, Derbyshire, Devon, Dorset, East Riding of Yorkshire, East Sussex, Essex, Gloucestershire, Greater London, Greater Manchester, Hampshire, Herefordshire, Hertfordshire, Isle of Wight, Kent, Lancashire, Leicestershire, Lincolnshire, Merseyside, Norfolk, Northamptonshire, Northumberland, North Yorkshire, Nottinghamshire, Oxfordshire, Rutland, Shropshire, Somerset, South Yorkshire, Staffordshire, Suffolk, Surrey, Tyne and Wear, Warwickshire, West Midlands, West Sussex, West Yorkshire, Wiltshire, Worcestershire, London, Antrim, Ards, Armagh City and District, Ballymena, Ballymoney, Banbridge, Belfast, Carrickfergus, Castlereagh, Coleraine, Cookstown, Craigavon, Derry City and Strabane, Down, Dungannon and South Tyrone, Fermanagh, Larne, Limavady, Lisburn, Magherafelt, Moyle, Newry and Mourne, Newtownabbey, North Down, Omagh, Strabane, Aberdeen City, Aberdeenshire, Angus, Argyll and Bute, City of Edinburgh, Clackmannanshire, Dumfries and Galloway, Dundee City, East Ayrshire, East Dunbartonshire, East Lothian, East Renfrewshire, Falkirk, Fife, Glasgow City, Highland, Inverclyde, Midlothian, Moray, Na h-Eileanan Siar, North Ayrshire, North Lanarkshire, Orkney Islands, Perth and Kinross, Renfrewshire, Scottish Borders, Shetland Islands, South Ayrshire, South Lanarkshire, Stirling, West Dunbartonshire, West Lothian, Blaenau Gwent, Bridgend, Caerphilly, Cardiff, Carmarthenshire, Ceredigion, Conwy, Denbighshire, Flintshire, Gwynedd, Isle of Anglesey, Merthyr Tydfil, Monmouthshire, Neath Port Talbot, Newport, Pembrokeshire, Powys, Rhondda Cynon Taf, Swansea, Torfaen, Vale of Glamorgan, Wrexham
Raspberry Pi Workshop for Schools
Practical programming workshop for schools
Raspberry Pi is a powerful pocket-sized computer that enables students to learn to code with programming languages such as Scratch and Python. It is used for many projects such as building an alarm circuit, creating a file server, electronic circuits, building robots and more.
This workshop will give students a basic understanding of the Raspberry Pi by getting them engaged in practical activities. The workshop assumes students have no prior knowledge of programming or coding.
Format
Secondary/Higher: 3 sessions x 1 hr 30 mins
(20 participants per session)
Age Groups
Y9 - Y13, Higher Education
Introduction to Raspberry Pi
- Raspberry Pi specification
- Models and main components
- General Purpose Input and Output (GPIO)
Control an LED
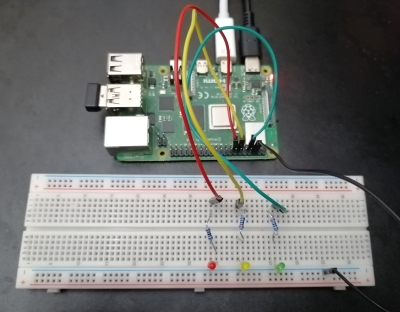
Programme Traffic Lights
Programme Traffic Lights
Additional Info
Requirements
We will bring the Raspberry Pis (1 per 2 students), chargers, all necessary wires, cables and circuit components.
The school must provide a computer room with monitors (1 between 2) that has either a VGA or an HDMI input, keyboards and a mouse. Higher Learners
We also provide coding workshops to college and undergraduate university students.
Day Itinerary*
Secondary and Higher
- Preparation - We will require 45mins - 1hr to set up all the Raspberry Pis before students arrive for the sessions.
- Practical - Introduce and explain all the main components of the Raspberry Pi to students. In particular, explain how the GPIO pins on the Raspberry-Pi function.
- Practical - Handout the breadboards, wires, LEDs, resistors and build the LED traffic light circuit.
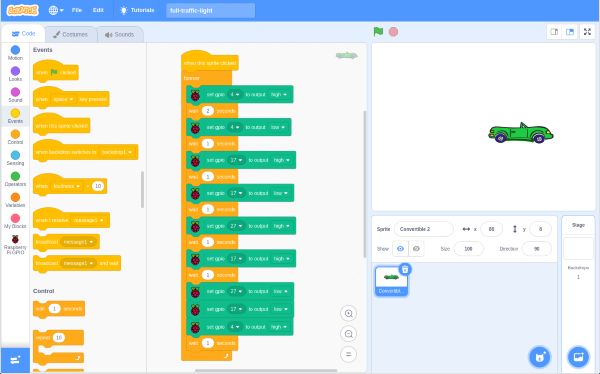
- Practical - Introduce students to the Raspbian Operating System (OS) and the Scratch programming software. Use Scratch to build a simple programme to light one of the LEDs in the circuit for a few seconds, and test it live.
- Practical - Add more programming blocks to the programme to light up all 3 of the LEDs (green, amber and red) in sequence. Run the programme and test it.
- Practical - Programme the rest of the traffic light sequence and test the entire programme.
- Practical - Higher learners will also programme the LEDs with Python and experiment coding a basic light disco.
- Demo - On some occasions we will do a short demonstration with our home built Raspberry Pi robots.
* The activities may vary on the day depending on the length of the sessions and the age and ability of the participants.
Cost
Please contact us to obtain a quote or request our price guide.
Checklist
-

-
-
Read our blog post here to find out how teachers can bring coding into schools for free.